Chocolate and caramel tarts

Pies

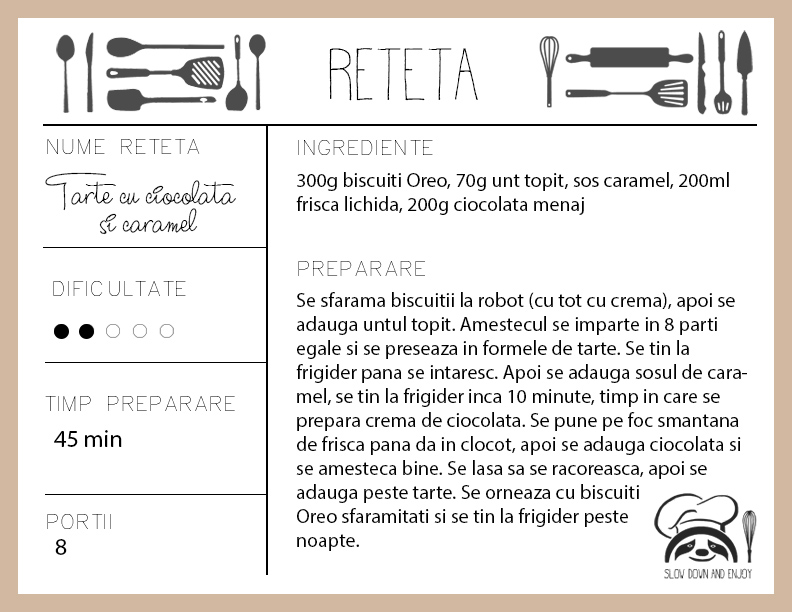
I can’t really wrap my mind around the fact that college started… again. With all the changes happening in my life -like waking up early in the morning, making my own food and staying way to much at school- I really wanted to lift my spirit up; and what better way to do that than baking something with lots of chocolate in it? These tarts are the perfect excuse to indulge something sweet and savory at the same time, without compromising your happiness.

01

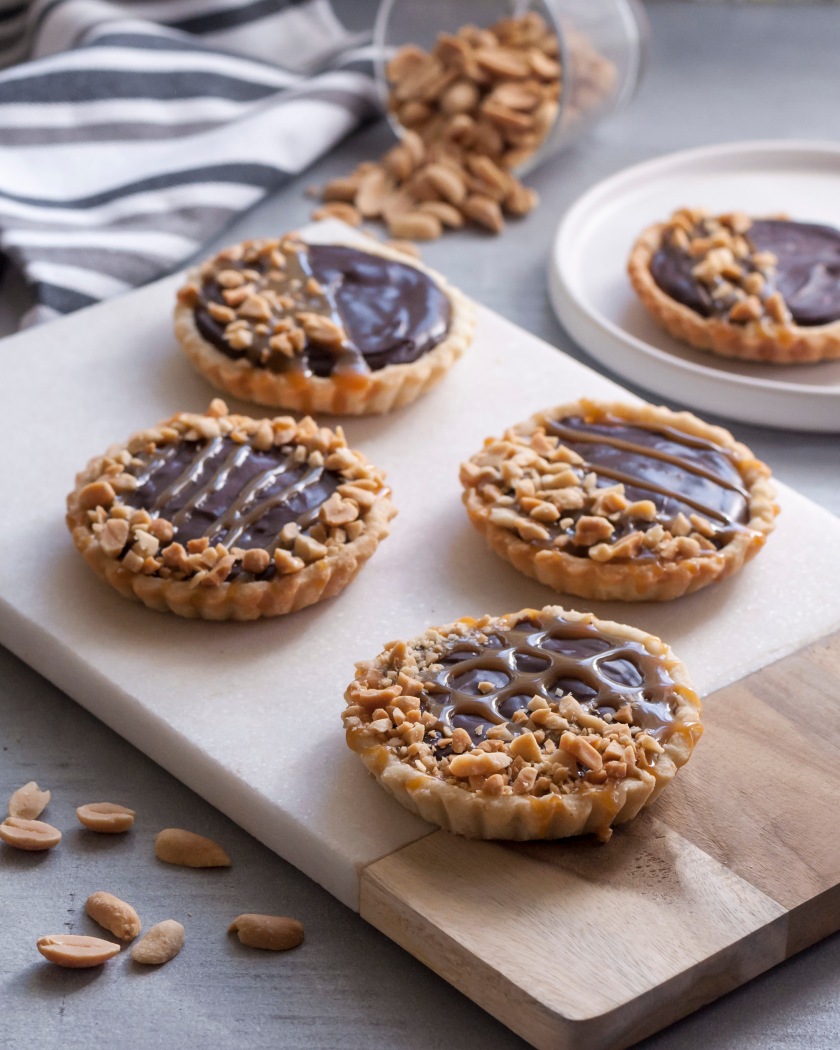
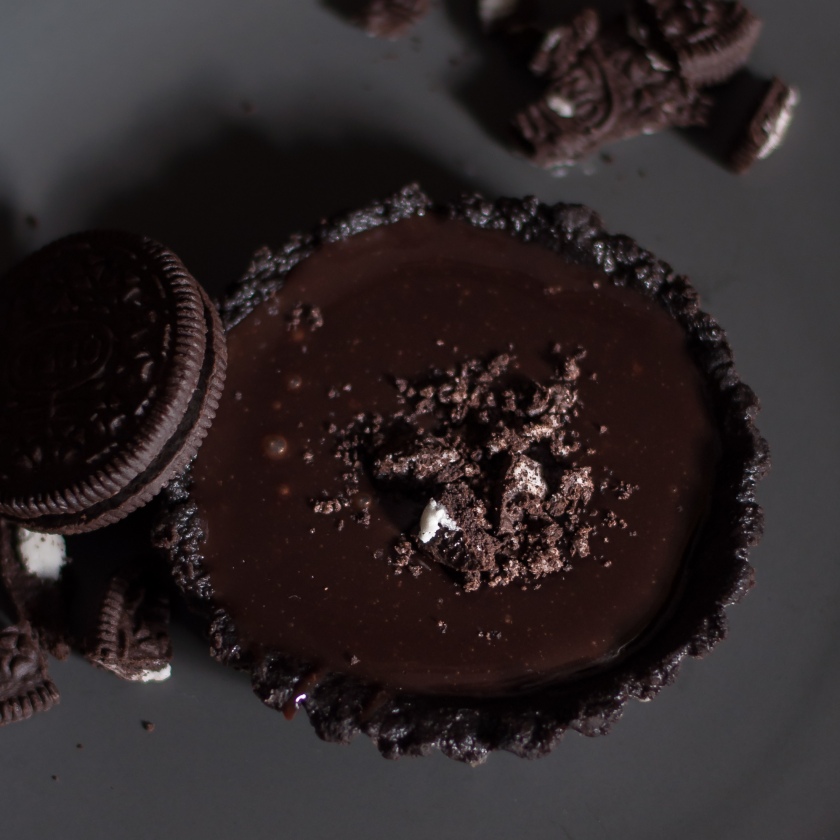
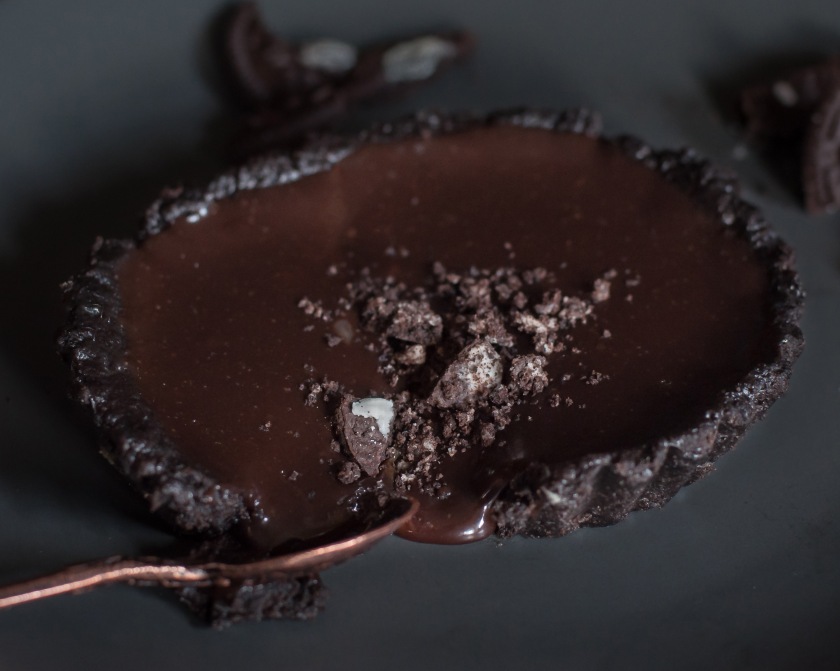
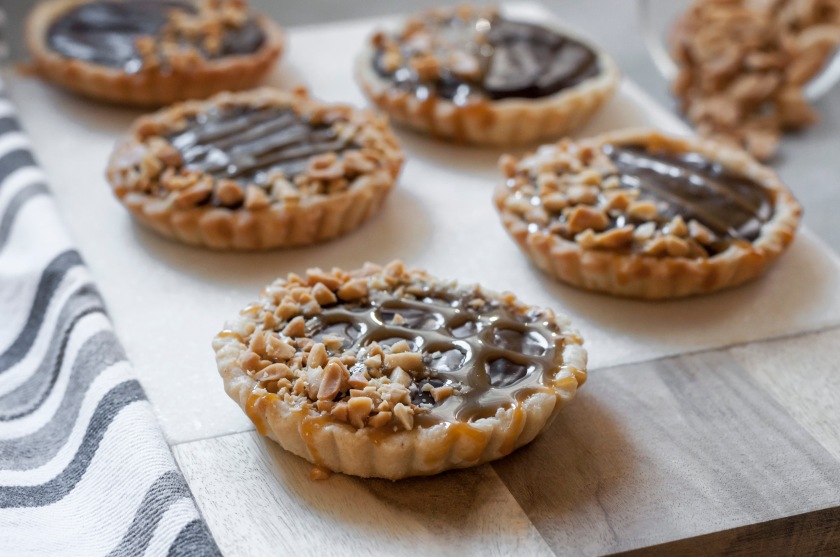
For the first time ever I betrayed my tart crust recipe and I went for the store bought one. Although it saved me some time, I am not that impressed by it; it tastes ok, I can’t complain, but for tartlets it’s not that efficient. You can’t reuse the leftovers that remain after cutting your small shapes, and I learned that the hard way. After rolling the dough again, it puffs up in the oven like crazy (time to switch to pizza bites haha). I still managed to ace 9 little cute tartlets shells tho!

04

The secret key to these lovely tarts is the layering factor. First you have the pie crust, which brings it all together, then you have the caramel sauce, the crunchy peanuts layer, the chocolate ganache and the caramel drizzle. And again some decorative peanuts. Boy that was a lot. Disclaimer: I don’t really care about calories (although I should), so I don’t mind the… boost in my daily intake, but if you are all about that stuff, you probably… should bake the tarts and change your mind. Tee-hee.

05

On another note… I really hope that I’m improving the food photography and editing technique, especially since I watched bromabakery’s tips for succeeding in this domain. In my opinion, the hardest thing to do is to find yourself and to find that something that makes you unique and different from all the other accounts that have the same theme. I am still working on that aspect… and most likely I will struggle with it for another period of time; but trying your best is what you should do, right?

07

The motto for today: sweet and savory, all in a shell- what else do you need?

Caramel and pear cake

Cakes

Hello, fall! I don’t know if I’m excited about this or not, because suddenly I can feel the responsibilities coming back in my poor student life, but I will try to embrace the fabulous beginning of a fabulous new season. Too much? OK, I’ll take it down a notch. In my desperate efforts to accept that summer is over, I was willing to sacrifice myself to a cake that has been present in my mind since… well, since I’ve discovered it on Instagram (because that’s my principal source of inspiration along with Pinterest- God bless them both). This amazing company in Moscow called @tortikannuchka  makes the most stunning cakes I’ve ever seen in my life, but one of them got my attention in an unhealthy way: a wonderful cake covered in dried and colored pear slices. I was madly in love with it, so I decided to try and recreate it in my own peasant, non-extremely-talented-chef way. Fast forward to the first days of September – I was blessed with a bag of pears that would represent the first step in the making of a pear cake.

I have to admit that I thought so intense about the exterior of this cake that I had no idea what it was going to be inside it until the big day. I knew that I wanted chocolate, but what tastes would go in harmony together? Not to mention that it had to be in sync with the pear exterior, cause what’s the use of covering your cake in pears if inside it’s going to be, for example, a strawberry cream. So, to recap: chocolate layers, a pear cream (had no idea how to do it) and… caramel, of course. But I never did anything with caramel before (the bought caramel sauce doesn’t count)! There were many unknown factors in this baking operation.

PS: I am proud to say that the black cardboard that served as a background will be retired; I finally managed to paint two wood boards! In my excitement I tried to play a little with the light and some pears. AND with one of the backgrounds.

First things first, I cut some pear slices with a professional slicer machine; it works just as well if you cut them carefully by hand in thin slices. Then I bathe them in sugar syrup colored with blackberries, blueberries and strawberries, and another round with food dye. I have to say that the natural dye from the forest fruits worked waaay better than the bottled one, so if you can, choose the first option of coloring. Place the slices in the oven and wait for them to dry, about an hour, then store them in the pantry, not in the fridge.

I baked the chocolate cake, it was cool. Then I got to the cream filling part. How does one melt sugar and transforms it into caramel syrup?? Luckily my mom was there to the rescue and she showed me how to get that amber colored sweet caramel. OK, I figured that part out. But how about the pears? There was no pear cream online so I can get some inspiration, but I already started to chop them in small dices. And poach them. In my mind it would turn into a thick cream like composition, but it wasn’t; it looked like a runny jam stuff. So I added some gelatin, but not enough to make it a stiff gelatin sheet, just the right amount to thicken it a little bit. Yay! I was finally on the assembly part of the cake.

01

One cake, syrup, caramel cream, one cake, syrup, caramel cream on the sides so the pears won’t drip out, pears on the inside, one cake, syrup, caramel cream, more caramel cream. I measured the diameter of the cake and start arranging the pear slices on the counter top in a pattern so I won’t freak out if I have a weird combination of colors left. Then I simply started to add them to the cake, slice by slice, until it was all covered (or that’s what I hoped I did). My cake was finished!!! I still don’t know how the master bakers keep their pear slices from curling, but I won’t give up and still try to ace this technique!

caramel cake

tort caramel

Twix brownies

Cakes

I cannot express how glad I am that I finally can post this recipe. It’s been in my food folder since January, when I first made it, but sadly I lost the photos – and I kept hoping I will find them somewhere hidden, cause what is a *food blog* without the *food photography *part? I don’t know if the new pics are better than the lost ones, but the brownies definitely were; practice is the key of success, right?

69

Let me introduce you to my party people (Pitbull and JLo reference, anyone?) these Twix brownies made out of  4 layers of sweet heaven: brownie base, cookie cream, caramel syrup, chocolate glaze.

22

First you got to make that basic brownie, wait for it to cool and start smashing some biscuits; you have to mix them really well with the cream cheese, otherwise it won’t stick to the previous layer. If it’s too stiff, try to soften it with a tbsp of milk. Add the caramel filling, keep in the fridge for half an hour, then prepare the chocolate glaze and pour it all over the cake (and wait for it to cool down- again).

100

Next step is… enjoy. Cut it in pieces and share it or eat the whole thing by yourself, if that’s how you roll. I won’t judge.

brownies

twix

Chocolate and caramel tartlets

Pies

Exams are over (at least for now), so let’s celebrate by eating some chocolate dessert! I couldn’t wait to share this recipe, but these days were so long and filled with studying that I didn’t find the time to edit and post something… But now I’m back at it! If you thought that a chocolate tart is awesome, wait till you try this caramel filled dream with an Oreo crust. I’m drooling even when I think about it.

_DSC0895

With this recipe I finally nailed the crumbled biscuit base; it didn’t fall apart when I took it off the tartlets tins and it stuck together like it was glued. So, I guess that’s a win for me. The secret is to grind the biscuits really well (keeping the cream also) and to mix in the melted butter while it’s still warm and liquid. Then you will be able to shape the tart crust easily, using a spoon and your own hands. The next step is to cool down in the fridge, but I kept mine in the freezer, so the whole process would take less time.

_DSC0916

Next step is the caramel sauce; I bought mine from Dr. Oetker, only because I was to lazy to make my own- after all, the blog is called “the lazy bakes”, right? (pls don’t hate me). Pour the filling in, 1/2 of the tart crust, and let it cool again.

The last step is to prepare a chocolate ganache; I cannot tell you what a difference makes the kind of chocolate you use to prepare this cream! Stick with the real baking chocolate, the one that has over 50% cocoa, and you will have perfect results. When I made these, I was cheap and went for the “cocoa bars” that they were selling in the baking section (you know, the ones with 12% cocoa or less) and they made my ganache runny and… I don’t know, it wasn’t right.

_DSC0922

_DSC0946

To finish off this long post, I will just say that YOU. MUST. TRY. THIS. Trust me, you will never go back to your old chocolate desserts after you tried this one.

oreo


tarta