Chocolate dome

Cakes

chocolate dome01297

I reached that point in my life where I am OK with spending my money on kitchen supplies rather than on clothes or shoes, which is weird, because everyone who knows me knows that I am (or was…) a complete shopaholic. But ever since I laid my eyes on this dome mold a year ago I wanted it to be a part of my collection of… 3 trays and 2 cooking rings (I’m working on it, ok?!). So one day I entered The Kitchen Shop, went straight to the trays section and held it close to me while I was browsing for other stuff. By the end of the shopping spree I found myself going to the cashier and paying some hard earned money for this 6 dome silicone mold. What can I say, I got hooked up on the idea of making all kinds of chocolate or fruits entremets covered in mirror glaze, with biscuit or brownie base, decorated with caramel, ganache or fruits; the options were unlimited!

chocolate domes

After a few tries I finally got right the chocolate dome; the first time I waited too long for the chocolate mirror glaze to cool and it was hard to spread around; taste wise, it was a sweet dream covered in chocolate and with an Oreo heart. The second time I used less whipped cream and I certainly incorporate better the chocolate ganache in it because it turned into a rich brown mousse. Also, I wasn’t left with a ton of cream to spare (it actually is the right amount yay). I didn’t use the Oreo heart anymore because the last time my dad scattered it all over the kitchen; guess it was to hard compared to the soft mousse.

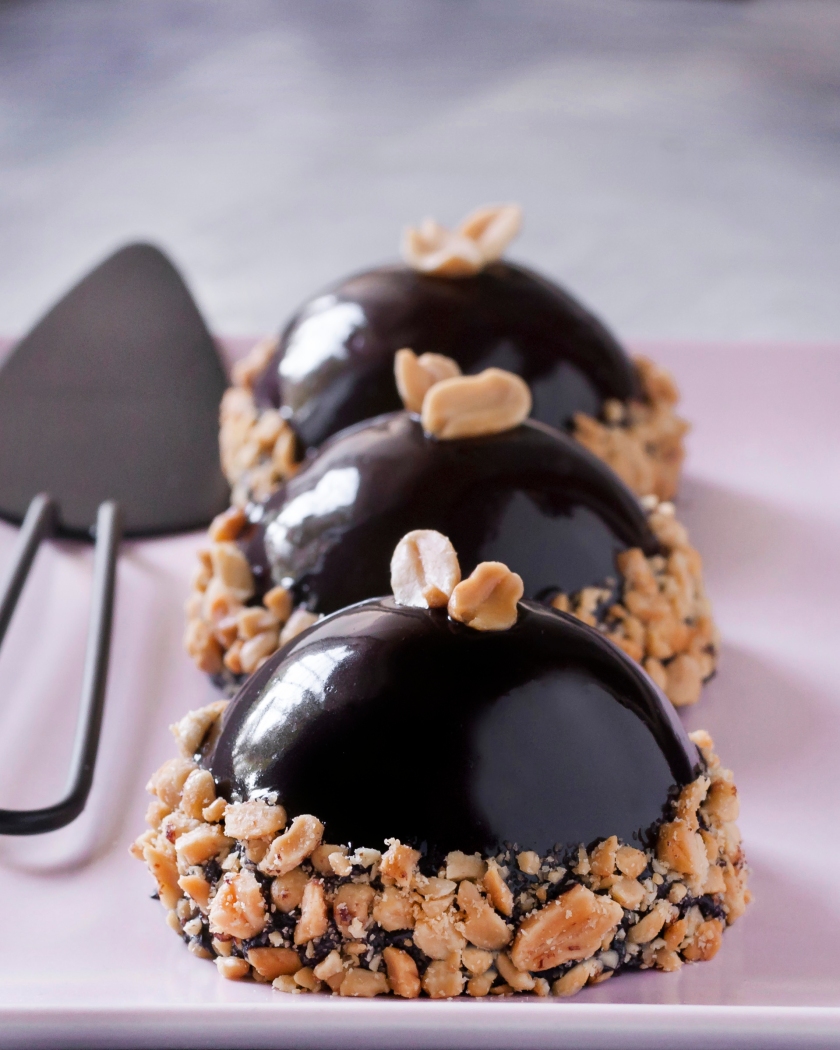
I made these a couple of times and I have to admit, every time I do it better than the last. That is encouraging, because I hope that people are not bored yet by my countless trials and they still enjoy the dessert. The soft mousse is a perfect match to the brownie base, while the chocolate glaze covers everything in a silky smooth layer; to add some contrast to all this sweetness, I paired the dome with a crushed peanuts belt. At some point, I swapped this for a crushed pistachio base, and it was great too.

chocolate dome01298

This is one of the desserts I will never stop making, for 3 reasons:

  1. unlimited choices of ingredients
  2. tastes heavenly
  3. looks like a high-end dessert made by a french pastry chef

Bonus reason: I absolutely love sweet stuff. And I have a feeling that everyone who reads this has, so … make. the. dome.

chocolate dome

dom de cioco

Coconut pineapple entremet

Cakes
This entremet recipe consists of a moist cake layer, a fruity pineapple jelly, a soft coconut mousse and a flaky coconut coat. Inspired by a cup of Tea and the gang’s “The Hawaiian” tea, this dessert is a tropical dream.
01
I’ve seen this kind of dessert for the longest time on my Pinterest page, constantly wondering how the holly biscuits it is made. In my little mind, I couldn’t figure out how the jelly would keep its form and harden in the mousse mix. Anyway, after some tutorials of french pastry chefs found on Youtube I was finally able to understand the concept of entremet. This fancy dessert is a multi-layered mousse-based cake with various complementary flavors and varying textural contrasts.
PS: you have to make each layer separately and then assembly the whole.
02
Why coconut and pineapple? Well, those tropical tastes are a match made in heaven, especially since they’re found in The Hawaiian tea, something I like to drink to imagine that I’m on a far away beach with a Pina Colada cocktail in my hand (even though I have never been to such a place, but still…). The coconut makes for a perfect white and fluffy mousse, while the pineapple is the fruity punch that every dessert needs in the summer time (also, so soft and delicate). The base is a basic sponge made with coconut milk, so it still has that Hawaiian taste that the dessert is promising. Finally, for a little texture, some coconut flakes make their way on the top of the entremet. I garnished each one of the desserts with a slice of pineapple and a coconut goody, only to balance the mix and to give that classy “I worked a lot on this” vibe (I actually worked a lot on it *wipes tears away*).
03
To tell you the real, not-so-glamorous story, I almost thought I failed making this. What a surprise, right? It was supposed to be a whole cake, but when I tried to remove the jelly from the pan in which it hardened, it fell apart. Also, I over-whipped the cream and it softened, so it wasn’t the right consistency, so I got extremely mad and decided to pour it in the little shapes and work with it and also to cut the jelly in little pieces. BUT I don’t have so many cake rings, and I had to improvise some from cardboard and aluminium foil. I have to mention that I also didn’t cover the bottoms of the rings, so … some of the mousse found its way out. Sad as one can be, I went to sleep thinking that if in the morning things were still moisty and runny, I would buy the ingredients and start again. My luckiest luck made everything fine the next day, as I would lift the cooking rings and everything would stay in place and look actually nice. I gladly sprinkled coconut flakes on top and gave them a taste and oh my, it. was. awesome!
04
I sure hope you won’t have the same adventure I had with these and stick to the recipe, so you can enjoy them faster and have a positive vibe all the process!
entremet engleza
entremet

Triple chocolate mousse cake

Cakes

_DSC0460

After a long pause from staying in the kitchen and pretending to be a master chef, I built some courage and got back in. I was feeling like doing something major, something that wasn’t a muffin or a cookie. So I went from nada to a big cake in just seconds of browsing.

22546816_1859969467377120_110273010_o

I got the idea for this cake from a local blogger, jamilacuisine, who made it look very appealing. I have to admit that this was a pretty expensive bake for my poor student wallet, but I couldn’t help but buying all that fancy chocolate and cream. I just hoped that this time I won’t screw up the recipe and need to buy more things (lol sadness).

makeof

So, the first layer is the baked one. I am not so sure I enjoy the recipe I tried out, but I will post it anyway and let you know when I find a better one; the reason why is because it grew weird and bumpy in places. My secret ingredient is some rum for the flavor, because I didn’t want it to be too blend.

The mousse layers are all the same, just the type of chocolate is different. Don’t forget to moist the gelatin before you start melting the chocolate, cause it needs to be added when the mixture is still hot. The time consuming part is the cooling things one; make sure the whipped cream is cold and the chocolate mix is room temperature before folding them together. Other than that, everything is pretty explanatory. (Oh, and just add some oreo on top!)


I served this cake to some friends to be sure I’m not the only one that thinks is amazing. The taste of three chocolate layers and the moussy texture led them to ask for another slice; yey! It was a success!

Recipe card

Romana:
Dupa o lunga pauza de la statul in bucatarie si prefacutul ca sunt un masterchef, mi-am facut curaj si m-am aventurat din nou. Simteam ca trebuie sa fac ceva maret, ceva ce nu era o briosa sau un fursec, asa ca am trecut rapid de la nada la un tort imens.

Pentru aceasta reteta m-am inspirat de la bloggerul jamilacuisine, care a facut-o sa para foarte apetisanta. Trebuie sa admit ca a fost destul de scumpa pentru buzunarul meu de student, dar pur si simplu nu m-am putut abtine sa nu cumpar cea mai buna ciocolata Nestle si Milka, caci stiu ca aceasta se va topi si omogeniza placut in prajitura. Am sperat doar sa nu gresesc ceva si sa fie nevoie sa ma reintorc la supermarket dupa mai multe lucruri.

Primul strat este blatul. Nu sunt sigura ca mi-a placut reteta pe care am incercat-o, dar tot o voi posta si va voi anunta cand gasesc una mai buna; motivul este cresterea inegala a acestuia in cuptor. Pentru aroma am adaugat rom – un capac- in apararea mea, nu aveam esenta in dulap.

Straturile de mousse sunt la fel, exceptie facand tipul de ciocolata folosita. Nu uita sa inmoi gelatina inainte de a topi ciocolata, caci trebuie sa fie calda cand este incorporata. Important este ca si frisca sa fie rece cand este batuta, iar amestecul de ciocolata sa ajunga la temperatura camerei pentru a nu se taia compozitia. Inafara de asta, mai pot da doar un sfat: pune oreo deasupra!

Am servit din tort unor prieteni pentru a ma asigura ca nu sunt egocentrica cand spun cat de minunat este. Gustul a trei ciocolate si textura usoara de spuma a condus la dublarea portiilor; yey!! A fost un succes!

Recipe card RO

pinterest-flatinstagram-icon-957