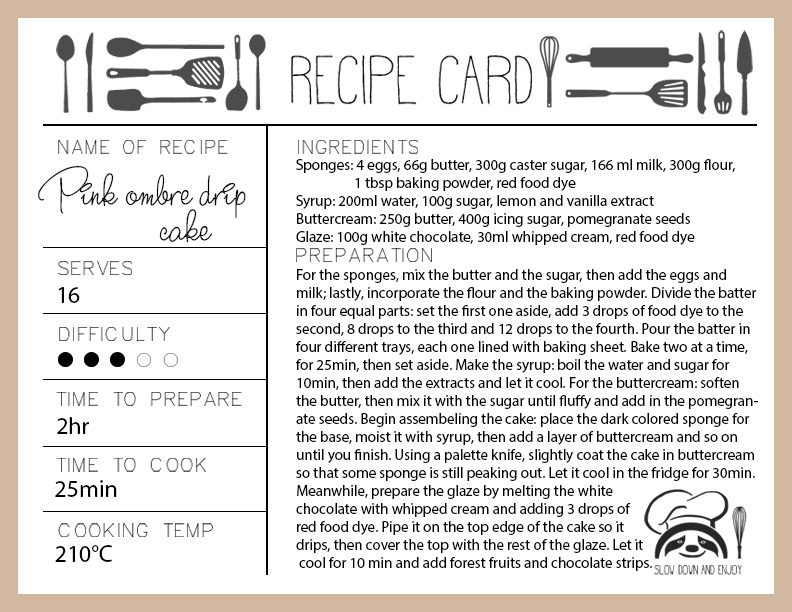
Valentine’s day just passed, so I was inspired to do something… really pink- aaand full of calories, because that’s just the way I roll these days. And since is the month of love, I will confess my deepest, darkest feeling: I just love butter so much!
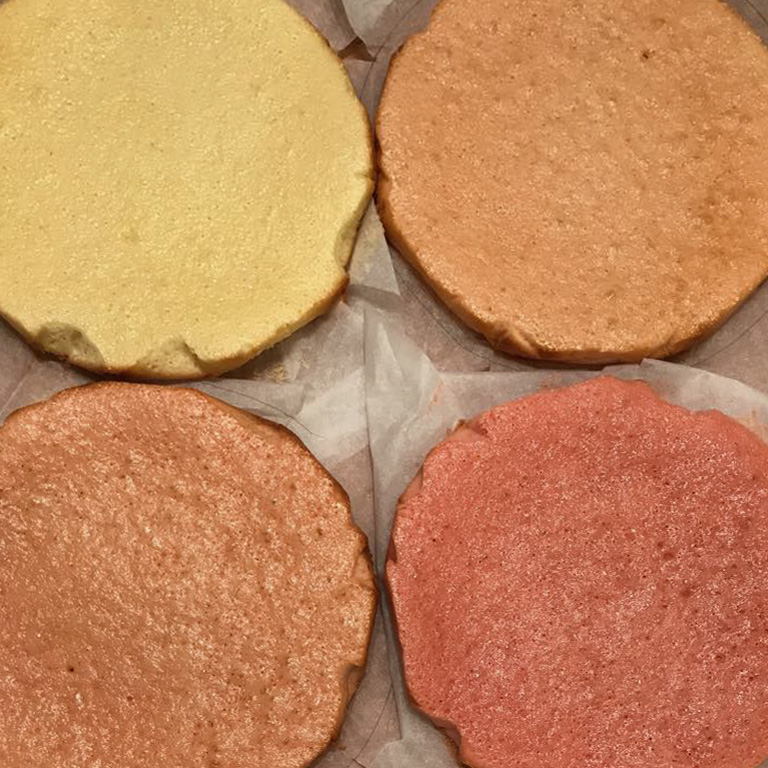
Joke aside, this was my first attempt of a semi-naked ombre cake, and more important, of chocolate decorations, so please don’t judge me. Making it wasn’t that hard, but it took a while since I wanted every step to be perfect. Now, as usual, I will share some secrets (or hints) that can help you get a better cake than mine. (the yellow light make my sponges look a little… orange-y; they’re pink, I swear!)
After you baked and cooled the sponges, you might want to cut the burnt/uneven edges. To do that, place on top of each one a slightly smaller round tray/plate and work your way around it with a knife. Easy!
In the buttercream, add a lot more pomegranate seeds than you see that I did. Trust me, the fruity-er, the better! If you want, you can switch the pomegranate seeds with some forest fruits or even make a lemon buttercream; it’s all about that taste!


Don’t be afraid of the syrup- moist that sponge really well so it can catch on the flavor! Also, you can try to make a forest fruit syrup- I think it can taste pretty awesome.
For the chocolate strips, simply melt some white chocolate, add food dye, spread it with a palette knife on a baking sheet and place it in the fridge for 15 min or so.
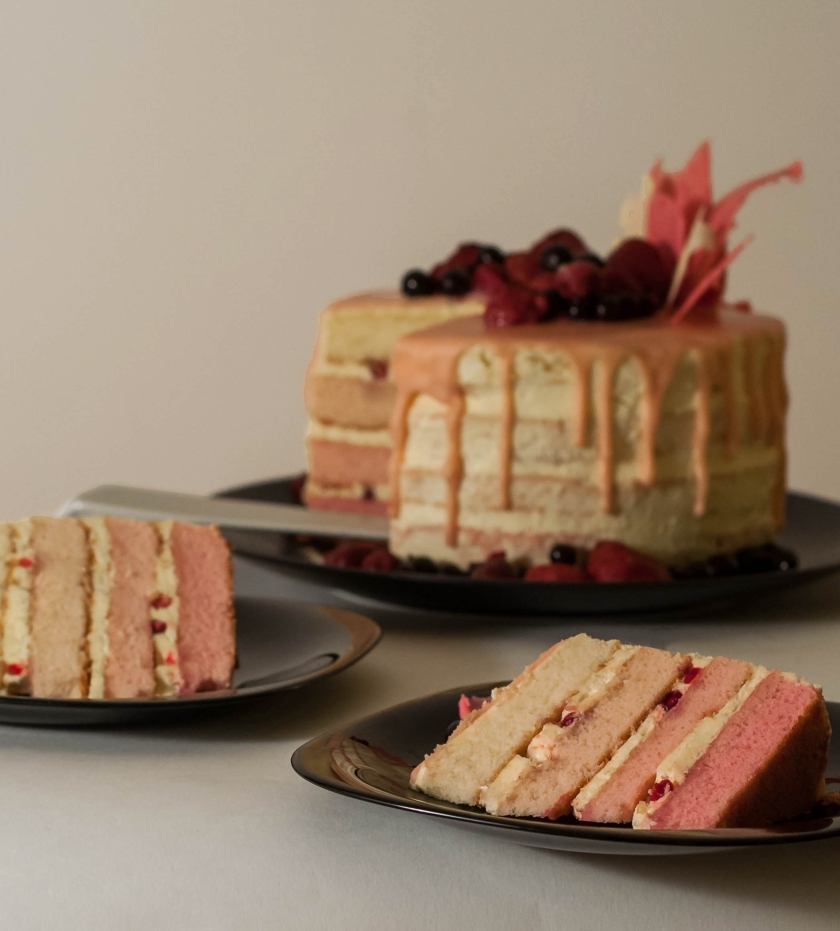
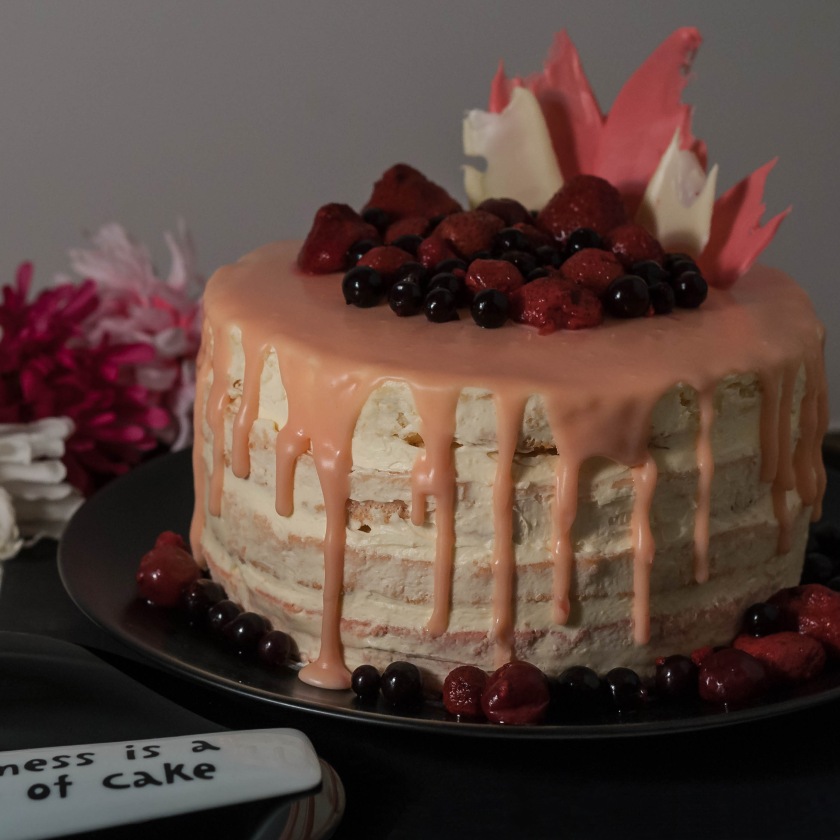
I absolutely love how this turned out, even though I’m a little disappointed that the pink gradient didn’t showed up so much on the exterior of the cake. But hey, at least all the slices will have a nice ombre of pink shades on them! If you want to know my way of making this beautiful semi-naked drip cake, the recipe is below:
Romana:
Ziua Indragostitilor tocmai a trecut, asa ca am fost inspirata sa fac ceva… foarte roz (si plin de calorii, caci asta prefer zilele astea). Din moment ce e luna iubirii, voi spune doar asta: iubesc untul!
Lasand gluma la o parte, aceasta a fost prima mea incercare de tort semi-dezbracat? (nu am idee daca asta e traducerea buna hehe), si mai important, prima incercare de ornamente din ciocolata, asa ca nu ma judeca. A face tortul nu a fost atat de greu, dar a durat ceva, deoarece am vrut ca fiecare pas sa fie finalizat perfect. Acum, ca de obicei, voi impartasi cateva trucuri ce te pot ajuta sa faci un tort in degrade mult mai bun.
Dupa ce ai copt si lasat la racit blaturile, poate vei dori sa tai marginile arse/inegale. Pentru a face asta, pune deasupra fiecarui blat o farfurie/tava rotunda cu diametrul putin mai mic si taie urmarind conturul.
Adauga in crema multe seminte de rodie. MULTE. Cu cat mai multe, cu atat mai bine! Daca vrei, poti schimba rodia cu fructe de padure sau chiar poti face o crema de lamaie (asta voi alege eu urmatoarea data).
Nu trebuie sa iti fie frica de sirop- insiropeaza blaturile foarte bine pentru a le da ocazia sa preia din aroma de vanilie sau lamaie! Poti incerca sa faci un sirop de fructe de padure; cred ca ar fi savuros.
Pentru ornamentele roz e de ajuns sa topesti ciocolata alba, sa adaugi colorant alimentar rosu si sa intinzi amestecul pe o hartie de copt cu spatula. Trebuie lasat la intarit in frigider pentru aproximativ 15 minute si poate fi pus pe tort.
Nu voi minti, sunt destul de incantata de rezultat, chiar daca initial am fost putin dezamagita ca degradeul roz nu se distinge si din exteriorul tortului, insa fiecare felie va avea un ombre roz minunat! Daca vrei sa afli modul meu de a face acest desert, reteta este mai jos: